Today I’m gonna show you, how to dual boot Deepin OS 20.2.1 and Windows 7/8.1 or Windows 10 in UEFI firmware BIOS devices. Why today I’m sharing this? Because most of the manufacturers are using the UEFI BIOS instead of old Legacy firmware. And it is not easy to install an OS in UEFI firmware since you’re using a GPT partition scheme for your HDD.
Deepin OS is the Chinese Linux distribution that was formerly based on Ubuntu until version 20 released in late 2021, now Deepin 20 has been released and it is based on Debian. Deepin OS is a beautiful and best Linux Distro but the company claims to provide the best and beautiful operating system, elegant user interface. It has its own DE(Desktop Environment) called DDE or Deepin Desktop Environment which is based on the Qt 5 toolkit.
I’m not going to show you the history of Deepin OS here I’ve collected some information from the Distrowatch website about Deepin OS and you can get to know about this distribution from the table given below.
[table id=2 /]
Now back to the topic of the post i.e. dual-booting Deepin OS 20.2.1 with Windows 10 in UEFI firmware device.
In this tutorial, We’re assuming that you’ve already installed the Windows 10 Creators Update or any update and you just need to make a partition of at-least 34GB or you can make larger for storing more files.
Dual Boot Deepin OS 20 and Windows 10 [UEFI Guide]
In this article, we make easier for you to install Deepin OS 20 alongside Windows 10 by dividing sections, this guide is especially for noob if you’ve already dual booted your PC with another distribution like dual boot with Ubuntu then you can simply do this and it is easy for you, but for noobs here I’m for helping them.
Download Required:
- Deepin OS 20 Latest Release ISO
- Rufus Utility for making bootable USB
Step 1: Make Bootable USB Flash Drive
After downloading both above files now you need to make your bootable USB file which will use to install Deepin OS on our PC.
- Connect your USB flash drive to your PC and run Rufus
- The Select downloaded Deepin OS iso file and click start


Once the process is finished, means your 1st step is completed now move to the second step.
Step 2: Make Partition For Dual-Boot Deepin OS
1. Ensure that your system should have sufficient space to install the Deepin OS you should have at least 34GB space on any partition and you have to shrink 34 GB to make a new unallocated partition, you can shrink more space from your partition if you need to install more application on Deepin OS or store images, music, and other files. To create Partition
Create Partition for Deepin OS
2. Open your Windows 10 and right-click on the Start button and click Disk management it will open the Disk Management utility.

3. Now Shrink at-least 34816 MB space from the C: Drive and click on shrink button to start partition resizing. Once the new partition is created it should be unallocated leave it as unallocated.


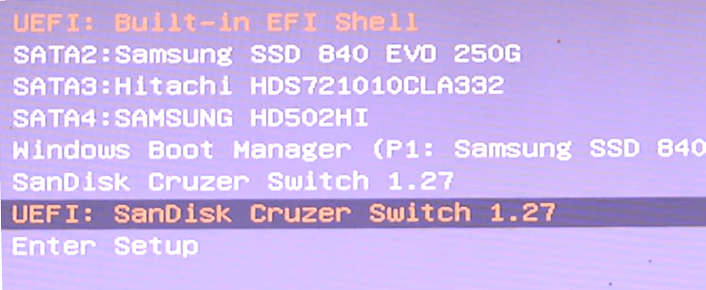
Now Reboot your PC and enter the boot menu
Step 3: Dual Boot Deepin OS 20 with Windows 10
1. Now Boot menu is open and selects your USB Flash Drive with UEFI Label. Once your USB is boot-up you’ll see a new grub screen that has grub menu then select the Install Deepin and hit Enter to proceed the installation.
Now the setup Wizard of Deepin 20.2.1 starts and you need to just follow the screen instructions as you just like normally install, choose your Language. and Click on Continue to proceed further.
2. Now enter your login information and credentials and click on Next
3. Now go to the Simple Mode by clicking Expert Mode located at the Top-right corner of installation window.

4. Then Partition Table should display, In this, you can create your custom partition layout for Deepin OS 20, Generally while Dual-boot any Linux distro with Windows we recommend that you create three partitions listed below
- root “/” partition for your root folder
- home partition for accounts data like Downloads, Documents, Music, Pictures….etc
- swap partition if you have 4 GB or less RAM on your computer or you are using an SSD.
root Partition
To create the root partition select the Freespace partition (that we’ve created shrink space from C: drive in Windows) and click on New Partition.

On Add Partition Settings use the following root Partition configurations and hit OK to apply changes:
- Type: Primary
- Size: at least 10240 MB
- Align: Begin
- FileSystem: ext4
- Mount: /


home Partition
Now follow the same process for creating the home partition, you can add use more Size for this partition but here I’m going to make it of 20480 MB. Use the following home partition configurations and hit OK to apply changes:
- Type: Primary
- Size: at least 20480 MB
- Align: Begin
- FileSystem: ext4
- Mount: /home


swap Partition
Now the final partition will be swap partition ( if you have less RAM) then follow this step otherwise skip this. Use the following swap partition configurations and hit OK to apply changes:
- Type: Primary
- Size: at least 4096 MB
- Align: Begin
- FileSystem: ext4
- Mount: swap


5. All 3 partitions have been created, now ensure that UEFI option below is checked and click on the root “/” partition then hit yellow Install, in order to apply changes to disk and proceeds the installation process.
A pop-up window will appear to inform you that the partition will be formatted if you continue the installation. Ignore this and click OK in order to start Installation.

Now, wait until the installation process is done and.

Once the Installation Succeed! hit the Experience Now button and your computer will reboot

Your computer will reboot into the black screen Grub menu where it asks you to choose your Operating System between Deepin and Windows 10 or wait 10 seconds it will open Deepin because Deepin OS is designated as default OS to boot from.

After Deepin OS boot finishes enter your password to login into your Deepin computer and you’ll see a beautiful Desktop and elegant UI of Deepin OS which is really awesome 🙂

congratulations You’ve successfully installed Deepin 20 OS alongside with Windows 10, In case you need to open Windows 10 then simply reboot your PC and choose the Windows (Boot Manager) from the Grub Menu.
Conclusion
So this is the easy way to dual boot windows 10 and Deepin OS 20.2.1 in UEFI, and you can also install Linux Distribution alongside Windows 7/8.1/10 the procedure remains same the difference in the installation wizard of the OS.
In case you want to remove Deepin OS from the Grub menu or want to make your Computer only Single boot that has only Windows 10 so let us know in comments it is very easy to remove Deepin OS from Dual boot and remove the Grub menu but make sure that you don’t delete/format the Partition in which Deepin is installed otherwise your computer will be stuck on the bootloader. This guide will help those users who are new to Linux so please recommend or share this article with some Linux newbies to help them that they can learn something new and let them know about the beautiful Linux OS Deepin. We’ll come with another interesting article, so stay connected!!
thanks for sharing this article
Great detailed guide!nice work.
Thanks Max ?
Your blog was fabulous prajwal
Every info in your blog was helpful for every person.
Actually I like your writing skill.
@Regards
Sagar_Chauhan
Thanks Sagar ? for your kind feedback.
Thanks for the guide. I’ve tried and now wish to revert to single boot Windows 10. Please tell me how. Thanks.
Hi Prajjwal,
I was able to setup Deepin OS with help of this very detailed Page, Thanks.
Could you also please share on how to remove Deepin OS and GRUB menu and make the system load Windows OS by default?
Thanks in advance.
-Santhosh R
To Remove Deepin OS and GRUB menu completely and make Single Boot, follow below steps:
bootrec.exe /fixmbrbootrec.exe /fixbootHope it will work for you 🙂
Thanks!
And after that, can you simply remove the Deepin partitions? Also, no data will be lost, right?
Thanks for sharing dude. keep it up!
Wifi connection is not working. How to solve the issue??
normal.mod not found how to fix this
I tried many times to do dual boot, but it was impossible. My computer os a Acer aspire e5, core I7, 8m. All the time, it started on Windows Mode.
Now you need to do set boot priority order and bring the Windows Boot Manager to the #1 then it will show the Grub Menu then you can make selection between Windows 10 and Deepin 😀
Remember to disable Windows Fast Startup.
You can disable it in Power Options –> Changes settings that are currently unavailable–> Click Turn on fast startup (recommended) so that the checkmark disappears.
Deepin, best Linux Distro IMHO.
Greate
You can also run the exe in the image.
Worked great, although I couldn’t set up a 3rd partition. Not sure why. So I just left the third step off and it went perfectly. Thank you! AND I’m a noob.
Is this safe to use? I tried one with Backslash 2 months ago, it fails all the time (I cant even get to the installer, grub only) and it broke my Windows 10.
my windows start direct without appears the options for deepin, could someone help?
Set the priority from the Boot Menu to the Windows Boot Manager, it currently set to the hard disk partition in which you’ve installed your Windows
So set bring Windows Boot Manager to the top in the Boot Menu list.
Remember to disable “Fast startup” in Windows to see Grub Bootloader…
Hi,
My install did not offer me a UEFI option to check after creating the partitions – the default was instead used. I can boot into Deepin or into windows but I have to go in advanced BIOS/UEFI settings to change the boot priority. Windows Boot Manager (SATA_0: ADATA SU800) – boots Windows. To boot Deepin I need to change the boot priority to SATA_0: ADATA SU800, which boots Deepin, but either way, I do not get a screen to make the choice when booting. What did I do wrong – or how can I correct?
Thank you!
Dave
Thank for simple and easy configuration guide for dual booting .
will try and revert back
Hola buenas tardes, tengo instalado en un PC Deepin, pero mi active directory está en Windows como puedo hacer para que se vea en el active directory e ingresar con los usuarios de windows?
De antemano gracias por la ayuda.
What to do if u like to remove windows 10 from the dualboot and use only Deepin as main OS?
Assuming you have installed Ubuntu on a separate partition, all you have to do is remove your Windows partition and remove the Windows option from your GRUB boot menu.
Make sure your backups of your documents (and other important files, such as ebooks, videos, music, and so forth) are current. If you are going to expand the Ubuntu partition to take up the space freed by removing your Windows partition, then this is especially important, as there is always some risk (though small) of data loss when performing dynamic partition resizing. However, even if you are not planning to do this, unless you are highly experienced with repartitioning, there is a significant risk that you may make a mistake (you probably will not, but if you do, you want the consequences to be minimally bad).
Boot from an Ubuntu live CD/DVD or live USB flash drive (as it is not considered safe to edit a physical disk’s partition table from within any of the operating systems installed on the physical disk). Select Try Ubuntu rather than Install Ubuntu.
Use GParted, the GNOME Partition Editor, to edit the partition table on the hard disk, removing the Windows system.
Start GParted (System > Administration > GParted, or if you’re using a live system of Ubuntu 11.10 or later, press the Super, i.e., Windows key, type gparted, and click the search result that appears).
Select your Windows partition (it will be of type NTFS and will probably have a pale green border).
Delete it (Partition > Delete).
Optionally, resize your Ubuntu partition to take up the freed space. You may be able to do this by selecting it (it’s of type ext4) and using Partition > Resize/Move. However, if it is contained in an extended partition (a kind of container partition for other partitions) and the Windows partition was not contained in the extended partition, then you may need to expand the extended partition first, and then expand the Ubuntu ext4 partition contained within it.
While this step is optional, the space that Windows occupied will not be available to your Ubuntu system if you skip it. (However, if you just want to use the space for storage, you could create a new partition for that purpose where your Windows partition used to be, instead of expanding Ubuntu’s ext4 partition.)
Apply your changes (Edit > Apply All Operations).
Quit GParted and reboot (click the power icon at the upper-right corner of the screen and click Restart or Shut Down). Once you have booted back into the Ubuntu system installed on the hard drive, update your GRUB menu to remove the Windows option, by running sudo update-grub in a Terminal window (Ctrl+Alt+T). When you run that command, you might be prompted for your password. As you enter it, you won’t see any placeholder characters (like *). That’s OK–just type it in and press enter. After you’ve run that command, Windows should no longer appear as an option to select in the boot menu.
However, unless your Windows partition is seriously damaged or infected with viruses, I wouldn’t recommend removing it. Instead, shrink your Windows partition, leaving space for your data plus an extra gigabyte for virtual memory (the versions of GParted that come with all currently supported Ubuntu releases are able to resize NTFS partitions). You never know when you’ll need to use an application that only works with Windows.
Source
Hi there , Joel here from the Netherlands, how to remove Windows 10 from the dualboot with Deepin , i like to use Deepin as my main OS, is the procedure the same as removing Deepin and back to Windows 10 as main OS?
If I remember correctly, in the past we had no choice to install a Linux OS Distro alongside Windows in UEFI Firmware…
Now It seems we can!!? Thanks to this Deepin OS.
Anyway Thank you for this lesson on doing just that. ( Grub it seems is very greedy just like Windows MBR, they both want to take over the boot process, but Windows always win!… Unless you get rid of Windows altogether and fresh install Linux only on your HDD. Thanks Again.
Hi there, am Hassan,i was using the dualboot but after a while i decided to use only windows but this time if i insert my windows bootable flashdrive it cant boot and shows something about error in syslin.But if the flashdrive is a linux bootable os it works fine.So why cant the machine boot the windows bootable os.little help would be very much appreciated
You just have to make the bootable USB .ISO with the UEFI compatibility.
And make sure secure boot is off, so it would be pretty easy to boot.
Now, it should boot, up and running!
I have successfully booted installer from flash drive set 20gb for home, 10 for root and 300 mb for efi partition. Install goes along just fine and asks to restart but it fails to show Deepin. I already disabled fast startup but I do not see Deepin OS as an option, only Windows Boot Manager when pressing F7 at startup. If I don’t press anything, it just defaults to Windows 10.
Bios: UEFI
Secure Boot: disabled
Fast startup: disabled
Hard drive: SSD (same drive as where windows 10 is installed.
You need to change the Boot Order…
Go to
The exact wording will vary on the different computer makes and models.
Now look for the Deepin entry. Select that one and save the settings.
OR try this
In your Windows 10, go to Change advanced startup options. Follow these steps:
Go to Settings >> Update & Security >> Recovery.
Click on Advanced startup.
Click on Restart now in the next menu.
In the following menu click on Troubleshoot.
Now click on advanced options.
Select UEFI Firmware Settings by clicking on it.
Now restart your computer.
Your system will now boot into BIOS. Using the arrow keys go to the Boot section.
Make sure that you have UEFI selected in Boot Mode.
Scroll down to the EFI section below which is your boot order.
Here set your Deepin OS at the top and your Windows boot manager below Deepin.
@Prajjwal Rajput
I have already done that and Deepin OS is missing from those boot order and boot manager. I only see Windows Boot Manager no matter what setting
Thanks a lot!
Ok got Win 10 and Deepin running, now how to install Linux mint on an extra partition?
So as to have Win 10, Deepin and Linux mint on one boot menu?
Why would my Deepin 15.11 install create a boot menu without the “Advanced Options” choice? I ask because I need to adjust the boot to Grubx64 I think because I get the MokListRT: invalid parameter error.
My all partitions are not showing , only showing few partitions .so i am not able to chose my free partition. what can i do now .
Thanks for this awesome Linux based os, today I have installed and I must say it is buttery smooth. My pc is 5 years old and still this os is faster then windows.
And one thing can you please post a article about how can we run single os I mean how can I delete this os from my computer as you mentioned that if I choose to delete partition then I’m gonna stuck on bootloader so please make a post about this one too.
Thank you in advance.
Hi, thanks for the excellent step by step guide.
I have now installed now deepin os on my old laptop alongside win10.
Though I couldn’t install it on my Asus zenbook 14 (Intel i5).
When booting from USB, it comes to a blank screen (-) with a highfen (not blinking). And tried everything to fix.
Any help or assistance pls?